如果我们需要在Bing Maps中加入一个小图钉标记,该如何实现了?Bing Maps控件已经为我们提供了这个功能,在Microsoft.Maps.MapControl名称空间下提供了实现图钉应用的图钉层Pushpin类,比如我们可以通过如下的方式来定位一个图订层在地图上的位置:

 代码
代码
<!--<br/ /><br/ />Code highlighting produced by Actipro CodeHighlighter (freeware)<br/ />http://www.CodeHighlighter.com/<br/ /><br/ />-->1doublelongitude=double.Parse("47.620574");
2doublelatitude=double.Parse("-122.34942");
3
4Pushpinpushpin=newPushpin();
5pushpin.Location=newLocation(latitude,longitude);
从上可以看书,实现定位还是使用的上一篇文章中介绍的Location类。呵呵,多记一遍~~~~那如何加入在地图中了,其实很简单的,Bing Maps地图控件直接提供了图钉层,通过内嵌的方式既可加入图订层,默认使用Bing Maps提供的图形标记。
代码
<!--<br/ /><br/ />Code highlighting produced by Actipro CodeHighlighter (freeware)<br/ />http://www.CodeHighlighter.com/<br/ /><br/ />-->1<m:MapCredentialsProvider="AkzZURoD0H2Sle6Nq_DE7pm7F3xOc8S3CjDTGNWkz1EFlJJkcwDKT1KcNcmYVINU"x:Name="map"
2Center="33.845881352,105.165628188471"ZoomLevel="6.0">
3<m:PushpinLocation="33.845881352,105.165628188471"></m:Pushpin>
4</m:Map>
不错,要在地图上加上一个图钉层就是这么简单,并直接定位于33.845881352,105.165628188471这个坐标之上,知道这个坐标是那里吗?他就在俺们“China”上,不行你可以看看下面的截图:

通过上述我们成功的添加上了一个小图钉层在地图上,除了添加图钉外,我们还可以自定义添加图形、图片、视频等在地图上,要实现添加图形、图片或视频等数据到地图上,需要使用Bing Maps为我们提供的地图图层(MapLayer)来实现,如下:
代码
<!--<br/ /><br/ />Code highlighting produced by Actipro CodeHighlighter (freeware)<br/ />http://www.CodeHighlighter.com/<br/ /><br/ />-->1<m:MapCredentialsProvider="AkzZURoD0H2Sle6Nq_DE7pm7F3xOc8S3CjDTGNWkz1EFlJJkcwDKT1KcNcmYVINU"x:Name="map"
2Center="33.845881352,105.165628188471"ZoomLevel="6.0">
3<m:PushpinLocation="33.845881352,105.165628188471"x:Name="mayPushpin"></m:Pushpin>
4<m:MapLayerx:Name="myMapLayer"></m:MapLayer>
5</m:Map>
如上在地图中加入了一空白地图图层,接下来就可以使用程序动态在地图图层上添加自己想加的东西了,比如上面我们已经定位到了中国地图区域,接下来我们将中国国旗插上地图可以吗?答案是肯定的,如何做?
代码
<!--<br/ /><br/ />Code highlighting produced by Actipro CodeHighlighter (freeware)<br/ />http://www.CodeHighlighter.com/<br/ /><br/ />-->1privatevoidbtnAddPushpin_Click(objectsender,RoutedEventArgse)
2{
3doublelongitude=double.Parse(this.tbLongitude2.Text.Trim());
4doublelatitude=double.Parse(this.tbLatitude2.Text.Trim());
5
6Locationlocation=newLocation(latitude,longitude);
7
8Imageimage=newImage();
9image.Source=newBitmapImage(newUri("http://localhost:2986/Images/China.jpg",UriKind.RelativeOrAbsolute));
10image.Stretch=Stretch.None;
11image.ImageFailed+=delegate(objectsenders,ExceptionRoutedEventArgsex)
12{};
13PositionOriginposition=newPositionOrigin(1.0,1.0);
14
15this.myMapLayer.AddChild(image,location,position);
16}
同样通过Location进行坐标的精度和纬度定位,通过将制定的图片序列为Image对象作为一个可显示的对象添加到地图图层就OK了。效果如下:
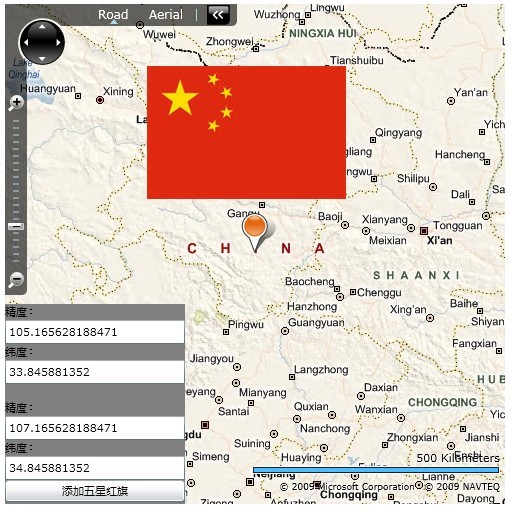
OK,成功的在地图上插上了中国国旗!~~~~~Silverlight完整代码如下:
代码
<!--<br/ /><br/ />Code highlighting produced by Actipro CodeHighlighter (freeware)<br/ />http://www.CodeHighlighter.com/<br/ /><br/ />-->1<UserControlx:Class="PushpinLayer.MainPage"
2xmlns="http://schemas.microsoft.com/winfx/2006/xaml/presentation"
3xmlns:x="http://schemas.microsoft.com/winfx/2006/xaml"
4xmlns:m="clr-namespace:Microsoft.Maps.MapControl;assembly=Microsoft.Maps.MapControl"
5xmlns:d="http://schemas.microsoft.com/expression/blend/2008"xmlns:mc="http://schemas.openxmlformats.org/markup-compatibility/2006"
6mc:Ignorable="d"d:DesignWidth="500"d:DesignHeight="500">
7<Gridx:Name="LayoutRoot"Width="500"Height="500">
8<m:MapCredentialsProvider="AkzZURoD0H2Sle6Nq_DE7pm7F3xOc8S3CjDTGNWkz1EFlJJkcwDKT1KcNcmYVINU"x:Name="map"
9Center="33.845881352,105.165628188471"ZoomLevel="6.0">
10<m:PushpinLocation="33.845881352,105.165628188471"x:Name="mayPushpin"></m:Pushpin>
11<m:MapLayerx:Name="myMapLayer"></m:MapLayer>
12</m:Map>
13<StackPanelHorizontalAlignment="Left"VerticalAlignment="Bottom"Width="180"Height="200"Background="Gray">
14<TextBlockText="精度:"></TextBlock>
15<TextBoxx:Name="tbLongitude"></TextBox>
16<TextBlockText="纬度:"></TextBlock>
17<TextBoxx:Name="tbLatitude"></TextBox>
18<TextBlockText=""></TextBlock>
19<TextBlockText="精度:"></TextBlock>
20<TextBoxx:Name="tbLongitude2"></TextBox>
21<TextBlockText="纬度:"></TextBlock>
22<TextBoxx:Name="tbLatitude2"></TextBox>
23<Buttonx:Name="btnAddPushpin"Click="btnAddPushpin_Click"Content="添加五星红旗"></Button>
24</StackPanel>
25</Grid>
26</UserControl>
27
本篇暂介绍到这里,希望提到抛砖引玉的效果,更详细的内容大家可参考官方提供API,同时欢迎开发Silverlight的Bing Maps的朋友前来讨论~~~
分享到:


相关推荐
学习笔记,方便以后查阅。解决上一篇留下的问题。拖拽图钉,弹出交互信息窗口。读取和使用交互窗口中的控件。
学习笔记,方便以后查阅。 添加可以拖拽的图钉。这次采用超图本身的接口。Pushpin和InfoWindow类。
每日提交 :two_o’clock: :shooting_star: 欢迎捐款! :sparkles: 知道数据结构算法 存储库包含各种数据结构的代码以及入职前课程资料,包括以下主题:数组,位操作,递归,棘手的问题陈述,数学编码问题,链接列表...
Google Maps距离 具有地址编号验证(巴西地址)和距离( )的多个地址()。 JSFiddle 奥特
Tourist-lovers-sns::round_pushpin:基于Spring Boot和Spring Cloud Alibaba的旅游爱好者社交小程序
:pushpin: :pushpin: :pushpin: Type :pushpin: :green_heart::balloon: :orange_heart::balloon: :blue_heart::balloon: :pushpin: :green_heart::balloon: :orange_heart::balloon: :pushpin: :green_heart::...
:round_pushpin: 课程理念和模板 在此存储库中,您可以为注册表格提供课程和模板,并从中找到想法。 如何使用这个 创建一个新俱乐部 如果您想根据此 repo 中列出的课程创建自己的俱乐部,请按照以下步骤操作: 使用...
南苑导览是一种由学生独立开发的以地图为载体,提供中山大学南方学院(南苑)具体地点的位置信息,导航,校园历史及文化介绍的小程序。逐步解决校园导航标识不到位,地图形式低效单一,信息设计不够好等问题,为来...
节目特色 :pushpin: 用python3 +编码 :pushpin: 私人卡 :pushpin: 连接到数据库 :pushpin: 实码 :pushpin: 在线测试 :pushpin: 生成代码,卡和日期 :pushpin: 产生卡号 :pushpin: 产生银行名称 :pushpin: 产生卡历史...
算法每天解决问题网站 백준 SWEA :eyes: 프로그래머스해시 :round_pushpin: :round_pushpin: :round_pushpin: :round_pushpin: 스택큐 [쇠막대기] :round_pushpin: [탑] :round_pushpin: 힙(堆) :round_pushpin: ...
:pushpin: 动态规划 :pushpin: 图、DFS 和 BFS :pushpin: 树木 :pushpin: 堆栈 :pushpin: 链表 :pushpin: 滑动窗口 :pushpin: 二分查找 【Leetcode 153. 在旋转排序数组中求最小值】(BinarySearch/Find_Minimum in_...
主题:高级软件分析 :pushpin: 指数 :black_nib: 单元1 Docs文件夹博客文件夹 :round_pushpin: :round_pushpin: :round_pushpin: :round_pushpin: :notebook: 单元2 Docs文件夹博客文件夹 :round_pushpin: :round_...
:pushpin: 演算法 :pushpin: 数据结构 :pushpin: 优化 :game_die: 数学 :pushpin: 模拟 :pushpin: 人工智能 :video_game: 游戏开发 :snake: Python和C :sparkling_heart: :man::laptop: :hourglass_done: ...
种植者应用程序可以在整个环境中运行,并且可以在任何格式的种植者中使用。 想法de @lgaticaq @raulghm y @juanbrujo PRESENTACION 补充补充。 肉类 应用程式 Aplicación网络程序(PWA) 地理定位使用权 实际...
图钉是在这里帮助。 在扩展选项中配置您最喜欢的一组固定选项卡。 单击图钉使固定选项卡出现在当前窗口中。如果他们是开放的,图钉会将他们移动到当前窗口。这将保留标签设置,如音频是否静音。如果他们不开放,图钉...
ReCapProject C#训练营实践阿拉巴·基拉拉玛·西斯泰米(Araba Kiralama Sistemi) :closed_book: 层数 :pushpin: 商业 :pushpin: 数据访问 :pushpin: 核 :pushpin: 实体 :pushpin: WebAPI :notebook: 数据库 :page...
:pushpin: 第一学期 :pushpin: 第二学期 :pushpin: 第三学期 等待到达那里... :calendar: :pushpin: 第4学期 等待到达那里... :calendar: :pushpin: 第5学期 等待到达那里... :calendar: :pushpin: ...
独裁图钉 官方的图钉插件。 当前默认为安装 。要求dokku 0.12.x + 码头工人1.8.x安装# on 0.12.x+sudo dokku plugin:install https://github.com/dokku/dokku-pushpin.git pushpin指令pushpin:app-links <app> # ...
:pushpin: 如何安装? :round_pushpin: 从VS Market: 在Visual Studio Market上安装->链接: :pushpin: 从Github: :round_pushpin: 克隆此仓库 :round_pushpin: 进入仓库 :round_pushpin: 回购内部开放端子...
modelStudio软件包可自动进行机器学习预测模型的解释性分析。 它以只有一行代码的无服务器HTML站点的形式生成高级交互式模型解释。 该工具与模型无关,因此与大多数黑盒预测模型和框架(例如mlr/mlr3 , xgboost , ...